Total Pageviews

Showing posts with label how to. Show all posts

Friday, December 31, 2010

How to Build a Simple Magnetometer for finding Magnetic Minerals

The earth is nothing more then a giant magnet as attested by its magnetic poles that attract a magnetic needle to magnetic North and South. The same phenomenon of magnetic attraction can be used to detect magnetic minerals even as small as what are termed micro-mounts, or for that matter large masses of magnetic minerals like magnetite below the surface of the earth. Although gold itself is not magnetic it often occurs in the company of different minerals that are; one example is granular magnetite.

Magnetic Vectors affecting a simple magnetometer.

This deceptively simple magnetometer can be used both at home or in the field. Its materials are also simple consisting of a very few parts that are obtainable anywhere. The core of this magnetometer is nothing more complicated than an ordinary soda straw with a small magnet glued on one end. There is a needle shoved through the straw at approximately its balance point with the magnet attached. The needle rests on two parallel sides are far enough apart to allow the straw to present up and down.

The best kind of magnet that you can use as a so-called rare earth magnet that is far more powerful than an ordinary magnet. Small maintenance of this type can be found in auto parts stores, sources say are part of an automobile alternator they can also be found in your local junkyard. The best kind of soda straw to use is one that has a flexible joint near its upper end, so you can bend the straw to get it perfectly balanced.

At home your magnetometer is used to detect magnetic minerals that is accomplished by passing the near the magnetic tip to see if the magnet is attracted. If it is you know immediately whether or not the mineral is magnetic, conversely if the magnet is not attracted to the specimen then it is not magnetic. This is important because many minerals look alike and the magnetometer test is one step in identifying the mineral.

In the field; all you have to do is walk a straight line while watching the straw, if the magnet is attracted to a magnetic mass in the ground the straw will move up or down. This is also important because many different mineral deposits are magnetic and have other minerals that are associated with them including gold. A quadrant can be added next to the straw so you can measure its angle. Changes in the straw's angle indicated underground masses of magnetic material.

Sorry, no pictures are available so please follow this URL: 

Saturday, December 4, 2010

How to use GPS to Stake Mineral Claims

I own a Garmin 90 handheld GPS unit that is designed for use in aircraft that although it doesn’t have all the “bells and whistles” as newer models used for navigating on the ground even so it is quite capable of accurately laying out property lines, and corner locations that is exactly what is called for to layout and stake a claim. 

A Garmin Legend unit


A degree of both latitude and longitude at the equator are 60 nautical miles or 69.046767 statue miles.  One minute is one nautical mile or 6080.20 feet, further, a second is 1/60 of a minute or 1,013.37 feet.  The GPS unit is set up so it reads in degrees, minutes and seconds.  The readout on the Garmin 90 will give you the following information heading in degrees.  My unit also gives you the speed at which you are traveling over the ground that probably is not important for any work done on the ground to stake a claim. 

Any GPS unit will give you your position on the face of the earth in degrees, minutes and seconds a GPS unit is accurate within about twenty feet that is accurate enough for government work especially the Bureau of Land Management (BLM).  It also gives the distance from a waypoint like where you started from.  Set that position onto your GPS unit as waypoint #1. 

When you have established your first position a.k.a. Waypoint #1 laying out a rectangular claim plot is like shooting fish in a barrel.  For example if we are heading north to stake the next corner just follow a line showing you are heading straight north on the built in compass.  This can be done by pacing (not very accurate, by reading the distance off the unit in parts of a nautical mile (a little more accurate) or with a tape measure (the most accurate).

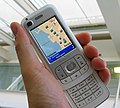
A Nokia GPS unit.


The GPS unit will indicate the new position where the next corner of the claim is located; enter that into the GPS unit as Waypoint #2.  Now either turn east or west to establish the next leg of your boundary line.  Measure off the distance to the next corner of the claim, and enter its position into the GPS unit.  For the third leg as an example turn another 90 degrees so you are facing due south and measure off the distance to the third corner.  Enter its position into the GPS unit then set the GPS unit back onto the first position and then you have successfully staked a claim.  You can stake adjacent claims by repeating the steps for the first claim except you only have to establish two corners; the other two corners are already established. 

GPS units are also handy for any other use you can dream up like finding your way to the nearest watering hole, or your base camp, or where you found interesting mineralization. The best way to keep this information is in some form of notebook the best is a surveyor’s field book having waterproof paper, and makes the notes with a black ball point pen. 

Although my GPS unit is intended for aviation it has been used extensively in my environmental consulting for establishing property lines, and the location of test borings,  The US DOD only guarantees accuracy within about 20 feet in practice I have found that the accuracy is often far better that is measured in a few inches.

THIS IS IMPORTANT: Before you use your GPS unit for laying out any claims be sure that you carefully read and understand any directions the manufacturer included with the GPS unit in the first place.  

Tuesday, November 30, 2010

How to Find a Job in Mining

One of the hats I wear is as an expert on the Internet a job that makes me an ordinary guy with a briefcase and a new pair of shoes fifty miles from home.  My expertise is supposed to be in geology, but the way it has worked though is most of the questions are how to get a job in the mining or oil and gas industries.  A job for which we are not the highly qualified expert, but we try.


How to Get a Job in the Mining Industry:

If you can't read German this is some miners at work in the 15th century by Georgius Agricola the father of mining engineering in his book De Re Metallica. This woodcut illustrates some early mining equipment that was in use then.    
The first thing you have to realize is that the mining industry is a lot of hard work, and not only that it is a boom & bust industry that operates on the whim of the overall economy of industry as a whole.  Mining is only one of the first steps on a long road until a finished product makes it to the final customer.

For the sake of this argument we will consider that you have a college education although some of the steps in this article apply to everyone.

·        Have an applicable specialty – basket weaving does not apply.
·        Get good grades – partying does not apply.
·        Most colleges have a placement agency that acts usually as a lifetime employment agency for their graduates, use it!
·        Most colleges also have career counselors that are often in your department, use them!
·        Prepare a good resume or CV before you go job hunting.
·        On the back pages of all trade journals there are usually help wanted ads, use them!
·        Most big mining companies have training programs, use them!
·        Most mining companies have web pages, read them if you are interested!
·        Most mining companies on their web pages have a listing you can click on saying, “Careers” or something like that, read them!
·        Practice the interview with a friend before you show-up for the real thing!
It takes a certain amount of patience to be a miner, and by the way if you have any questions you would like answered just leave them in the comments box at the bottom of this blog.

Mark Twain once defined a mine as a deep hole in the ground with a damned fool at the bottom, and a damned liar at the top – Maybe he got it right!